Tuesday, November 26, 2013

There was Crying Over the Spilled Milk


See that white stuff?  That is a whole gallon of milk spilled on my newly purchased groceries and and freshly mopped kitchen floor.

Clara was trying to help me put away the groceries.  She picked up a gallon milk and was trying to bring it over to the fridge when she dropped it, blowing out the side of the carton.  I quickly ran over and grabbed the still gushing gallon, but it was too late.

When it first happened, I felt myself boiling, I could feel myself about to explode.  I looked at Clara who had retreated to bury her head in the couch.  I took a deep breath and grabbed my camera and snapped the above picture.  

Even though I lovingly reassured my baby that I knew it was an accident and that I wasn't mad at her, she cried.

I asked Amelia to run and get our stack of beach towels.  Isaac and Amelia helped me to pick up the wet groceries and sacks and set them on the towels.  Normally I keep the sacks to recycle for our garbages, but not this day!

I wish that I could say that I remained calm during the whole clean-up process, but unfortunately I didn't. There was a little bit of yelling when Isaac picked up one particularly soggy sack and walked across the kitchen floor - milk dripping the entire way.  There were also some exasperated and cross words when Amelia only brought 1 towel to clean up the mess.

I am not hoping for more spilled milk (there is still a foggy residue left on my kitchen floor even after mopping 3 times), but I am hoping that if there is a next time, I will handle my emotions better for the clean up.  I am hoping that I can speak more clearly about what I need so that my other kids, (the ones who had nothing to do with the mess, but are willingly trying to help clean it up) aren't getting chewed out for not following directions precisely.  

And really, there isn't any use in crying over spilled milk.  There isn't any good done by yelling at the kids who are trying to help.  It just took a little time and effort to clean up the mess.  It was an accident and I have good kids who wanted to help make the situation better.  I need to remember that a little more next time.

Monday, November 25, 2013

A Quick Under-the-Sink Fix Up

Friday evening, I was looking under my kitchen sink for some cleaner and I got fed up with how it looked.

I pulled everything out from under there and wiped it down with a wet rag and some cleaner.

This is what it looked like:


In the back was the worst part.  Our sink had an undiscovered leak for a while and this is the damage it had done when we finally discovered and fixed the problem.

I knew Nathan had some sticky-tile in the garage from a project he did a couple of months ago.  (You can pick this stuff up at Lowes or Home Depot or get a box from here.)  While the cupboard dried, I went out to the garage and rounded up 6 of the sticky tiles.

Starting in the front, I laid one whole tile down and then worked my way across the front.  They I went to the back.  This required cutting the tile a little bit.  I actually started in the middle because one tile would fit between the two pipes that come up through my cupboard.

I didn't concern myself too much with lining the tile up on the back row like I had done with the front row. My thoughts were that it was in the back and no one would really see it back there but me.

This is the tile that covered most of the damage.  Even though there are some gaps in the tile, it will still look tons nicer and be easier to wipe out and clean.

I neglected to take a picture with everything organized and put back in there, but it seriously looks so much better.

If you don't have sticky tile laying around, you could use contact paper as well.  If you live relatively close to me, I still have a whole bunch of this sticky tile in my garage you are welcome to come and take a few pieces.

Wednesday, November 20, 2013

A Wet Game & Sick Kids

Nathan, the kids and I went to a very wet, cold game on Saturday to cheer on our team.  We left at half-time since the Cougars were so far ahead and our little ones were getting chilled to the bone.

Mental note for me...  Remember that next time it is raining, put on the ponchos before getting out of the car and walking to the stadium.  Don't wait to get to the stadium to put them on or everyone will already be wet. Wet=Cold.  Duh!

Probably as a result of the cold from the game and a lingering congestion from the week before, Jared and Clara were pretty sick on Monday.  I told work that I would be working from home that day and I kept them both home with me.  They slept and cuddled under blankets on the couch while I worked and played nurse.

I also made these for dinner since I had a lot of time to make the dough.

I could do that everyday!

Later that evening Clara found a balloon and tried to figure out how to blow it up.  I wish I would have gotten video of her.  Her poor little cheeks looked like they were going to burst.

The next day we were back to work and school as usual.  Bring on the week!

Friday, November 15, 2013

Ham and Cheese Pinwheels

I came across a pin for these Ham and Cheese Pinwheels a while ago on pinterest.  The pin I pinned didn't link back to anything, so if you know where the original pictures came from, let me know.

Last night I decided to make them for dinner.

Here's how mine turned out before baking and after.

Making this was not rocket-science.  It was super simple.  You could use pre-made refrigerated dough, but I just whipped some bread dough up really quick.

Ham and Cheese Pinwheels

Ingredients
Bread Dough
Sliced Ham
Grated Monterrey Jack Cheese (you can use any cheese really, this is just what I had on hand)
Sliced Muenster Cheese

Directions
Roll dough out into a rectangle shape.  Top with sliced ham.  Then add a layer of muenster cheese down the middle.  Spread shredded cheese around the edges.  Then carefully roll up. (If you need a visual of this click here to view the original pin on Pinterest.)  Cut into 1-2 inch sections and place on baking sheet.  Bake in the oven at 425 for 20-25 minutes.

_______________

Super yummy,  They were a hit with the kids and the hubby.

I also whipped up a sauce to go with them, just some mayo and dijon mustard mixed together.  Delish!

Thursday, November 14, 2013

Not So Cavity Free...

We made our semi-annual visit to the dentist yesterday and I almost forgot to take a picture!  Can you believe the horror!  It has sort of become a tradition for me to post a post-dental visit picture to the blog.

Unfortunately, Mr Isaac had a cavity, so he was ostracized from our "cavity-free" picture this time.  Better luck brushing next time bud!

Here is the cavity-free crew, a little blurry, showing off their teeth.

Super proud of Clara for actually letting the hygienist clean her teeth this time!

Thursday, November 7, 2013

A New Fall or Thanksgiving Wreath

I was inspired the other day by something that I saw on Pinterest.

Here is the original for sale on Etsy for $40.00.
Fall/Thanksgiving Grapevine 14" Wreath

I knew that I had most of the necessary items at home to make this wreath.  

I had some fall leaf garland and an old grapevine garland in my decoration box.  I knew I had some dark brown burlap from another project and some hemp string in my craft box.  After gathering my supplies and my glue gun, I got to work. 

First, I had to make the grapevine from a garland into a wreath.  I determined the approximate size I wanted it and then began to make a circle.  I used the hemp string to keep it together.  Then I made the burlap flower - more on that below.  Finally, I finished it up with some leaves from the old garland.

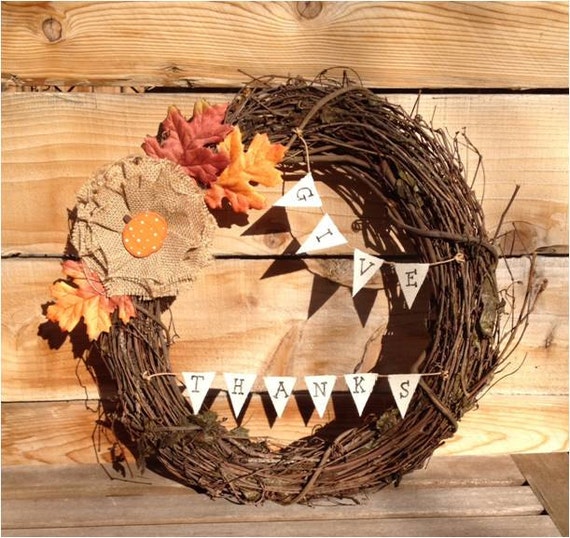
Here is my finished project.  I would still like to make a little banner that says "give thanks", but I haven't gotten that far yet.


I've never really made flowers from fabric before, but I found that the easiest way for me was to slightly fold the fabric alternating from the front to the back to make a "flat" flower.  To make more of a "round" flower, I folded to the front.  My burlap flower consists of 2 "flat" flowers and 3 "round" flowers of different sizes.


Wednesday, November 6, 2013

Working with a Donkey

Clara hung out at work with me yesterday.  We went to +Wendy's for lunch and she got this Shrek Donkey mask in her kid's meal.  Hilarious!

I had the new Pretzel Pub Chicken Sandwich for lunch and it was delicious!

Monday, November 4, 2013

Those Darn Sewer Lines

My husband and his father spent all day Saturday digging up my father-in-law's front yard.  He had a break in his sewer line.

You can see parts of the old clay pipe behind Nathan on what is left of the grass.  It had caved in and broken. There were also roots growing in the line.

Jared sits in the machine waiting to fill the hole in.  Nathan let me try my hand at running that piece of machinery.  Let's just say that there was a lot of jerking and shaking...

 The hole.

Men at Work!


In September of 2011, we had to dig up our sewer line as well.  The sewer had backed up twice into our basement.  Thankfully both times we had only washed clothes and taken showers, so the backup wasn't extremely gross, only super gross.

I realized I had never posted the pictures of that glorious event, so here they are.

Here is the mound of dirt that was taken out of the hole.

Looking down in to the hole.  12 feet down to the broken line.

See that yellow line?  Yeah, that's the gas line that Nathan accidentally cut in half and we had to call and have repaired.

And here is the root ball that was growing in my sewer line and clogging it up.

Here is to hoping that you never have to dig up your yard to replace a broken sewer line!

Friday, November 1, 2013

Halloween 2013


Jared as an old man.

Isaac as a zombie.

Amelia as Dracula's wife.

Clara as a little devil.

With the exception of Clara, I let the kids pick their costumes this year.  I also told them that they needed to get together/make them.  I think they did a great job.  I did help with the makeup.